
The ultimate guide to Amazon Product Photography with 8 great tips.
- Richard Goodwin-Wilcox

- Jul 3, 2020
- 6 min read
Updated: May 30, 2022
This guide has been put together as an essential reference whether you are shooting images yourself, or hiring a photographer to do so.
With the 'Bricks and Mortar' to eCommerce transition accelerated by the Covid 19 pandemic product photography has never been more important. Think about it, the way people see your product now is not at a shop in person but in pictures online, particularly Amazon. For this reason, so much now hangs on the quality of the imagery you distribute through eCommerce platforms. That is why I am going to walk you through a simple guide on how to create amazing photography for your Amazon product listing.
Types of images:
It is important that each image that you have in the listing fulfil a certain role. Let me break this down into sub-categories to help plan your production.
Hero Shot

This is the single most important image, it will be the first image your customers see, it needs to draw them in, it needs to be a cut above the rest of your competitors. We want the customers to click your link and not there’s. This image will ideally include the core elements of the product your customers will receive. It must also use a catalogue white background (rgb: 255,255,255, the colour of this webpage).
Product Photographs
Similar to the hero shot in style. Usually 2-3 images, these images will show the product from a few more angles and are a great way to show off any highlights. One of these images will ideally be of all the contents that are delivered to the customer.
Infographics
An infographic is a combination of both an image and some graphics, typically text and arrows but maybe more complex than this such as illustrations and logos. Not essential for all listings but typically useful. 2-5 images ought to be infographic images. These images will help to tell the customer, specific features that make your product so great as well as explain how the product functions or dimensions.

Lifestyle Images / Action shots
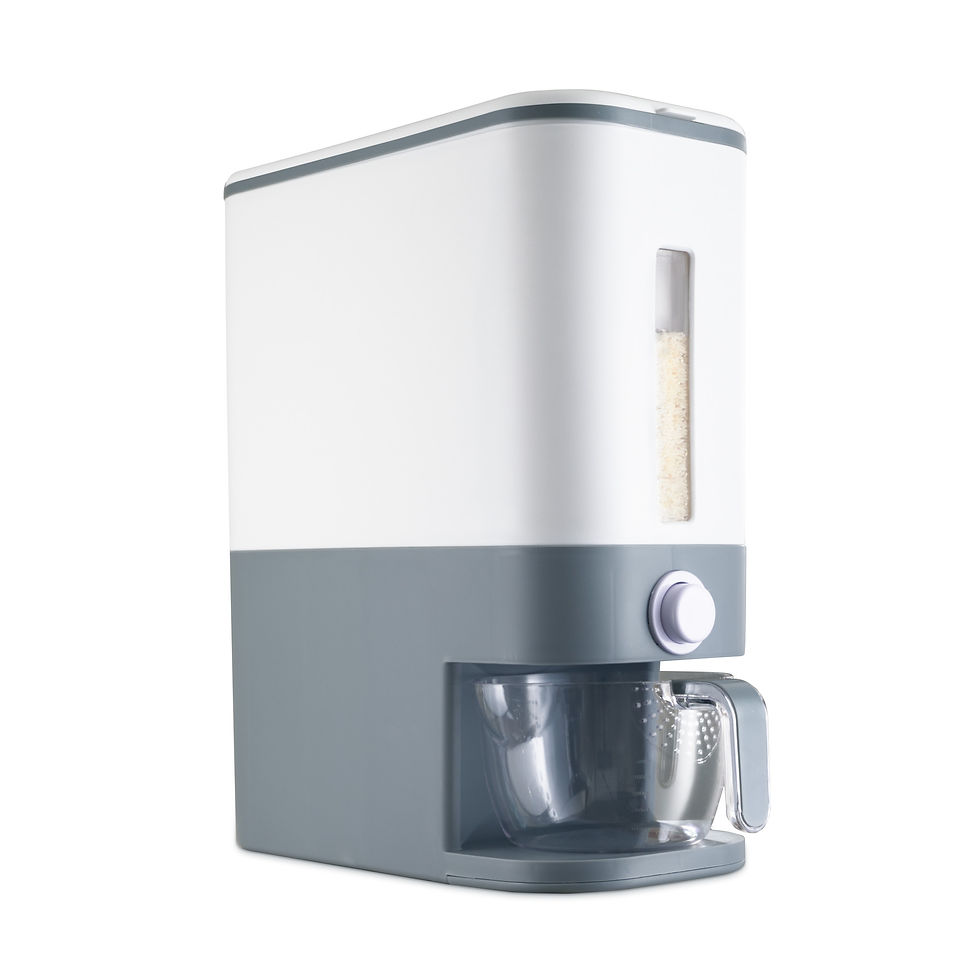
Lifestyle images are those which show your product being put to use, maybe you sell rice dispensers, how about creating a beautiful kitchen environment? Usually, it is recommended to have 2-3 lifestyle images. The images should be focused on creating a want, letting the customer see how great life with your product is.
Tips for Great Amazon Photography
By applying these tips to all of the categories of images mentioned above you will be able to create stunning Amazon photography that helps you to convert eyes to sales.
1. Fill the frame.
You are given a thumbnail to display your product, so why not use it all. Amazon recommends that you fill 85% of the frame with the product. There is a good reason for this, though you may be using a PC (or mac) to upload your images to the site, the majority of the people that view your listings will be on their phone. Smaller screens mean the detail that you may be able to see on your large monitor is too condensed on a phone, therefore by filling the frame with your product you will give the customers the greatest opportunity to see all the detail of your fantastic products.

2. Use professional lighting
If there is one thing that sets apart a professional studio quality photograph from an image shot against a white wall, it is lighting.
Professional quality lighting should be used to create contrast and depth to the image as well as outline any product highlights.
The lights themselves need to be highly colour accurate, where a reflection of the light can be seen in the product it needs to be white with no colour tint to it. There is a measurement of this, it is called CRI you are looking for a light in the range of 90-100. The best alternative is to use daylight.
Using professional lighting will elevate the quality of the images and impact your product's perceived value.


3. Consistency
A must, images need to be consistent, not just across the listing but across your entire product range. If there are any product variants (different colours, sizes etc.) the variant images need to have the product in the same location, shot from the same angle and under the same lighting.
By being consistent across your product portfolio images should also be consistent with your brand, this may help customers to identify your brand amongst other sellers on Amazon.

4. Use absolute/catalogue white.
There is only one true white when it comes to digital displays, it is measured as RGB 255,255,255; that may sound like nonsense to you, but all the white on the background of a photograph when measured should return that value (excluding deliberate shadows).
Basically, this is the white you see in the background all over the web, in fact it is the white that surrounds all the words on this page. It is also the white that all other Amazon listings use as well as the white for the background of the Amazon site itself.
The reason that you want to replicate this white consistently throughout your image background is that if not it will steal attention from your product and towards the unsightly background image. Not only that, your product will stick out like a sore thumb amidst the rest of the listings on the site, and not for the right reasons.
5. Always favour real images over stock ones

It is quite common on Amazon for suppliers to use stock imagery. There are two reasons: one, it is often cheaper than having the images shot, and the other, sometimes the required scene is just unrealistic to recreate (imagine trying to create a listing for a snow sledge in July).
There are two good reasons why you should avoid stock photography in favour of real images:
The first is that it makes your brand appear unwilling to invest in creating something new, what does that say about the products you are selling. Generic photography is a show of generic products.
Secondly, you are limited. In creating imagery using stock photographs one is at the whim of what exists on the likes Shutterstock and Adobe and that might not be the perfect fit for your product. Not to mention there is a good chance your competitors are using the exact same image as you.
There is still a place for stock imagery. My retoucher and I are experts in compositing products into images and lean on it when we have to. We both agree, however, that it doesn't beat the real thing, it should always be a last resort.
6. Use a neutral white balance
Very simple, there should be no colour cast on the image, it should not have an overall blue or yellow/orange tint across the image (unless intentional, like sunset scene). If it does this is because the white balance is off, it can be rectified in image editing software like photoshop. If the white balance is off, products won't look as they do in person and will have an unnatural hue to them. This is just one more way to ensure that your images look professional and help demonstrate you are a quality brand.
7. Comparison
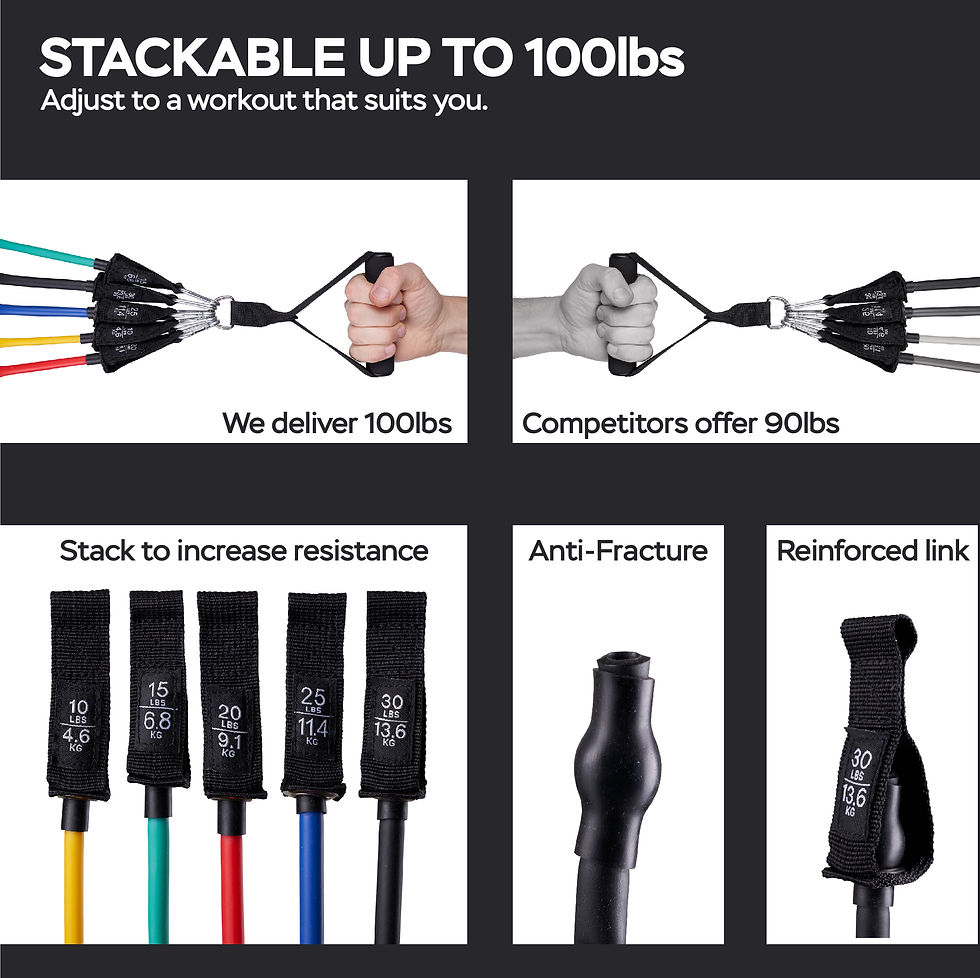
It is an excellent idea to create an infographic that compares the features of your product with generic competitors. Amazon is super competitive and comparison charts are the best way to really establish the edge over your rivals.
8. Get a professional
Photography is much more complicated than just taking out your phone and going 'snap'. There are many technical elements that can't all fit into a blog and take years to master. Not to mention you'll also need a dab hand at graphic design too. Choose an expert like Blank Canvas Ink.
Finally:
Amazon has minimum requirements for their images I suggest you go beyond and above these to ensure the best quality results on the platform.
Use these export settings
Total photos: 7
Aspect ratio: 1:1
Resolution: 2100x2100 (photos over 1000px on the long side allow scroll and zoom capability) Ideal file size: 2-10 MB file size (photos over 10 MB will be rejected) Pixel density: 72 dpi File type: Use JPEG, TIFF or PNG file types.
By now you may seem a little overwhelmed with all this, thankfully as the writer of this blog I have it all internalised, if you are looking for great Amazon Product Photography, look no further than Blank Canvas Ink.

Comments